Tuesday, 10 February 2015

Miss Havisham Styling: Wedding Dress, Necklace and Stick


Wedding Dress

When I was deciding what dress to choose for my model, I tried to keep in mind that the camera would only see the top part of the dress and possibly the arms, depending on how I got the model to be positioned. I looked into Victorian dresses and found that many of the styles had a square shaped neck line, a cinched in waisted and then a flared out skirt. I typed 'victorian dresses' in google and found that there were many costumes made that had the same quire neck line. The shoulders were made to look wider with this style of neckline to accentuate their tiny waists; this is because the contrast of the wide shoulders and big skirts would make their waists look smaller. The arms were kept looking slim all the way down in the early Victorian era, but later the style was for the lower part of the arm to be flared.

Sketch of examples of Victorian dresses.
http://trulyvictorian.com/history/1840.html

Victorian wedding dress, costume.
http://fc01.deviantart.net/fs71/i/2011/187/0/7/victo
rian_wedding_gown_by_ravennacat-d3l8f4h.jpg

Example of a Victorian dress with a square neckline.
http://www.lolitauk.co.uk/media/catalog/product/cache/1/image/9df
78eab33525d08d6e5fb8d27136e95/G/V/GVD-0030.jpg

Another example of a Victorian dress with a square neckline.
http://mccallpattern.mccall.com/filebin/images/product_images/First_Full/M6097.jpg
I noticed that in the 2012 film version of Great Expectation, Helena Bonham Carter, who played Miss Havisham, wore a dress with a square neckline, as shown below.

Miss Havisham in Great Expectations 2012 film.
http://i.kinja-img.com/gawker-media/image/upload
/s--XHl7W6Gy--/18ivzfkkv3xm1jpg.jpg

I found my grandmother's wedding dress in the attic, and although it wasn't worn in the Victorian era, I still think it could work really well for my Miss Havisham look! The neckline is square and the arms are slim fit, which is what some of the Victorian dresses looked like that I have seen. This is also the veil that my grandmother wore, however I want to make some changes to it to make it suit my character better. I will add some of my own flowers and change how it is attached to the hair. I will also need to make the dress and the veil look more worn out and dirty to make it look like she has worn it for many years. 


Necklace

Many of the victorian inspired necklaces I found were very big and bold and I don't think they would have suited my Miss Havisham character as I see her to be more dainty and fragile. I found some images of some more understated victorian inspired necklaces that I thought would be more suitable and I have shown some of them below.

Antique Victorian Rose Cut Diamond Necklacehttp://indulgy.com/post/1UFEGdqQk1/anti
que-victorian-rose-cut-diamond-necklace
Blue Victorian Style Antique Silver Filigree Swarovski Crystal Teardrop Necklacehttp://indulgy.com/post/LL74Qo2iq2/peacock-bermuda-blue-victorian-style-antique
After looking into these victorian inspired necklaces, I looked around in my mum and grandma's jewellery collections and I found one that I thought would work. I have posted images of my chosen necklace below. It has a teardrop shape with blue jewels as decoration, which is almost a mixture of the two necklaces above! I am excited to use this necklace in my final image as I think it looks very victorian and suitable for my Miss Havisham character.


'Crutch-headed stick'

Pip says that 'she had a crutch-headed stick on which she leaned, and she looked like the Witch of the place'. In my look I am adding subtle witch references, for example the wart on her nose, so I also wanted to give her a 'crutch-headed stick' to lean on to, again, add a witch-like feel to my final Miss Havisham look. I was inspired by this image of Martita Hunt playing Miss Havisham in the 1946 film version, with her leaning over a dark wooded stick. I looked up Victorian crutch-headed sticks and many sticks came up with gold or silver embroidered heads with animals and patterns on them, however I didn't think it was necessary to spend a lot of money on a stick like that because her hands are going to be covering most of the head of the stick anyway. However, I did also notice that all the wood was either black or a dark brown so I wanted to make sure I got the colouring accurate. 


Martita Hunt playing Miss Havisham in 1946.
https://31.media.tumblr.com/9f0275578b3150267bee41d6
37633453/tumblr_inline_n30p463wt51spj3em.jpg
I decided to use the walking sick shown below because it looked very old and had some holes in it, making it look eroded and moth-eaten. I was also the correct shape as Pip described her walking stick as 'crutch-headed'. However I decided that the wood needed to look a lot darker to be more historically correct. I therefore experimented with dying the stick using different products, however I found I got the best results when using the Ronseal All in One Wood Finish.


'Before' image of the stick.

Products I experimented with.

Most effective and therefore chosen product.

Close-up of how the wood looked after the colour was added.

Final result of the stick.
I am really happy with the results! The wood looks a lot darker and more dirty which I like and it looked quite uneven which I think also adds to the old feel. I will be incorporating this into my look as I think it will add a different aspect to the look; I will therefore need to put make-up on my model's hands as they will now be in the frame.


Resources:
http://trulyvictorian.com/history/1840.html

Wednesday, 4 February 2015

Expression Through Makeup Experimentation

This was a fun lesson where we could experiment with colours and patterns to show someone's mood. Here I looked at Estella and on one side I wanted to portray her mean, heartless, ugly side and then on the other side, I wanted to portray how I think Pip sees Estella, so I  wanted her to look beautiful, fresh and youthful. 

I chose to make this side of the face very theatrical as her evil side is almost like a wicked witch or evil villan. I chose the colour green to represent poison, as I think Estella leaks poison into Pip's heart. I wanted her to have a harsh contour to represent her harsh and strong ways. I made branches coming off her eyebrows and the side of her eye because I thought of incorporating poison ivy into the look as it's poisonous to anyone that comes into contact with it. The black branches coming out of the side of her eye also represents tears, as even though she looks hard on the outside, she is crying out for help on the inside. I am happy with how the contouring car out, however I think the skin looks slightly blotchy. I am not happy with how the eyebrows came out because they look very sloppy and not perfectly neat; however I know that I could do this better if I had more time and in this lesson, it was mainly about experimentation. 

Cold and Heartless.
I wanted this side of the face to have a much more calming and soothing feel to it. I wanted it to be very soft and feminine and pretty as this is how I think Pip sees her. I mad eyer skin look very natural and fresh as in the Victorian era they thought the beauty ideal had very natural and barely there makeup. I gave her a subtle pink blush and pink lips to give the look and girly touch. I brightened the eyes with a light shimmery shade on the lids and brow bone and gave her a little definition in the crease. To improve on this look, I think I could have used a brightening concealer to cover the darkness under the eyes. I also would probably add a shimmery highlight to add a more youthful and playful look. I think I could have been a lot more creative with this look and thought more outside the box, so I will keep that in mind for later looks; however I like the contrast between the theatrical 'evil' side with the natural 'beautiful' side.

Beautiful and enticing. 
My Final Look.

How to: Late Victorian Hair

Equipment:
-Tail comb
-Paddle brush
-Hair elastics
-Hair grips
-Hair curlers
-Dry shampoo
-Desired decoration

Step by step:
1. Brush the hair back and create a centre parting with the tail comb.
2. Draw a line with the tail comb from ear to ear and take those front two sections and secure them separately with elastic bands.
3. Takek a U shaped section, as shown below, and secure this with a hair elastic in a high ponytail.
4. Curl the hair in the ponytail in small sections.
5. Twist each curl from the pony tail around the bunch to make a pretty bun. Don't make this a perfect 'ballet bun', but just make it look full and curly.


 6. Curl the lower part of the hair in small sections, keeping the tong facing upwards, so that the wand can be pulled out to make ringlets.


8. Pin up some of the curls to the ponytail to add decoration and fullness. Make sure the ends still look curling. Do this to about half of the lower section.


 9. Split each front section in half, so you have four sections along the front of the head.
10. Curl the outer sections in one big curl, going downwards, and pins these curls back to the ponytail.
11. Split the two sections into three and curl each section with the tong facing to the back of the head, so that the curls fall forwards.
12. Comb through each side lightly so that the curls on each side form one big curl on each side.
13. Take each curl back towards the ponytail in a pretty 'swoop' so that there is a wave at the side and some height on top.


14. Take some curls up from the bottom to make the curls all fall in a smooth transition, as shown below.
 Ageing
15. Spray dry shampoo all over the hair to give it a grey, dusty look. You can also use coloured sprays for this or brush through some supra colour.


16. You can also add decoration into your hair look, for example flowers or gems or ribbon. 


I am really happy with my outcome because I think it looks very pretty and feminine and full. When I do a similar look to this hairstyle again, for Estella, I will put the ponytail higher up so that there is more body at the top of the hair. I will also use a smaller curling wand so that the curls are tighter and more like ringlets. I wasn't too keen on the flowers because I think they look too fake and tacky and wouldn't be suitable for an accurate Victorian hair look. I am really happy with how neat the sides look and how even I got the waves and height on top of the hair. 

Monday, 2 February 2015

Miss Havisham's Make-up: Facecharts

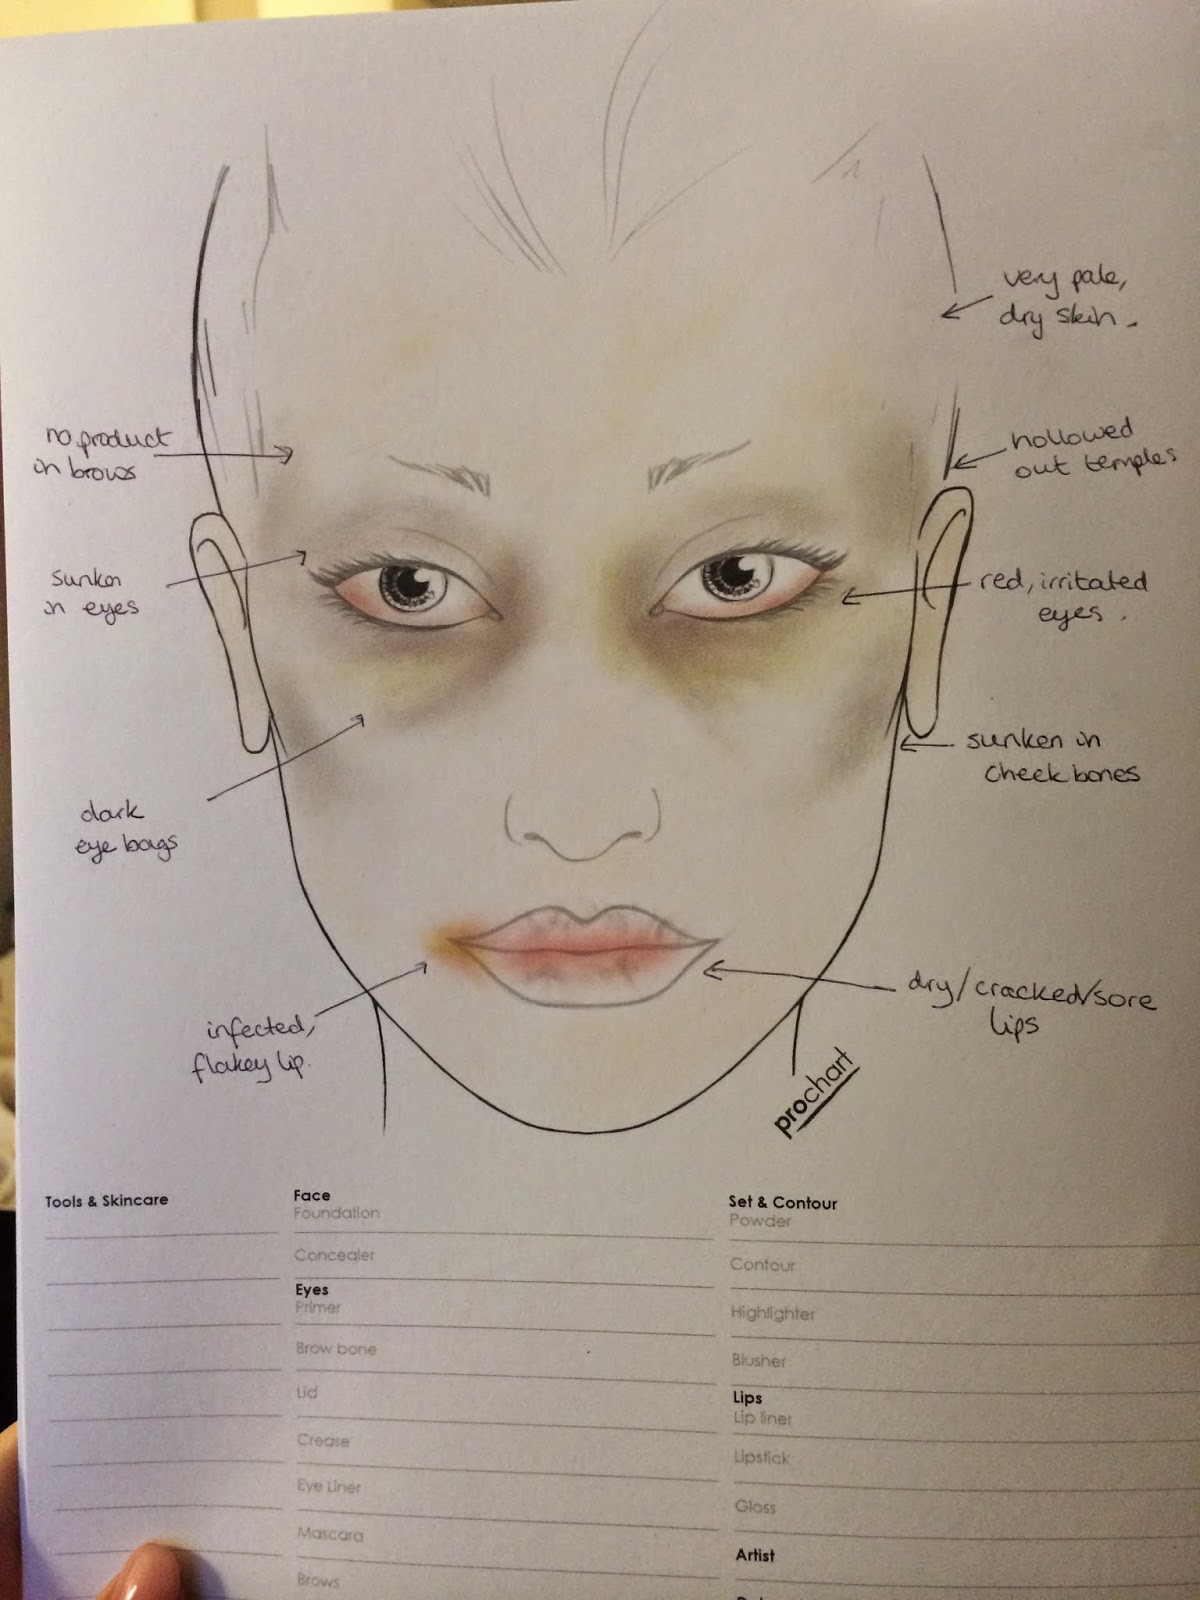
I wanted to use my knowledge of Victorian make-up so that I could create a look that I think Miss Havisham would have worn on her wedding day and how it would have disintegrated and smudged since then. I did a post called 'Victorian Beauty Ideals' where I talked about the makeup that they would have worn and it turns out they liked a very natural look.

I decided to do a face chart of what I think her makeup would have looked like on her wedding day so that I can get a better idea of what it would have looked like if she didn't touch it for so many years!
Miss Havisham's make-up on her wedding day.
Idea 1

In my first design I wanted to focus on how tired and old she is. The book says that she has an 'old ghastly bridal appearance' and that she had 'old restless fingers' which both suggest that she is old to I decided to emphasise her wrinkles on her forehead, under her eyes, round her lips etc. It says Miss Havisham has 'sunken eyes' and 'dark eyes' so I wanted to show this by adding some dark shadows under and around her eyes to show this. The book says she looks like a 'skeleton', that she has 'shrunk to skin and bone' and she had 'worn away', so I wanted to contour her face with a brown/grey colour to make her face look skinny and hollowed out. Miss Havisham says she had 'never seen the sun since' Pip was born and it says 'daylight never entered the house' which suggests that she would be very pale and 'ghostly' looking, I would therefore make her skin look paler than usual. It says that Miss Havisham is 'not physically strong' which suggests she is weak, but could also imply she is prone to infections and illness. This could mean that she had very dry and flaky skin and lips; I would portray this by using lots of powder and some duo glue. The book describes her as having a 'worn face' which suggests its been damaged. I therefore think that adding scarring to her face would work in showing that she had been injured, but that her body was not fit enough to heel the wounds properly. In the face chart below it shows that she has a scar on her lips and a couple around her face, but I could also show her with an open wound that hasn't quite heeled yet. 

Idea 1
Idea 2

This idea focuses on her very chapped and infected lips and also her tired eyes. I wanted to keep her skin very pale as she said she had 'never seen the sun since you were born' and therefore her face wouldn't have been able to tan for years. I also wanted to contour her face with a grey/brown colour to make her look skinnier and hollowed out as it describes her as 'worn away' and she she has 'shrunk to skin and bone'. I would not emphasise her eyebrows as I don't think she would have filled them in so I will just add a bit of grey to make her look slightly older, as my model has brown eyebrows. I will add a lot of darkness around her eyes as it says they were 'dark' and 'sunken' in. I may add some red to the waterline and along the lower lash line to make it look like she has been crying and to make her look more tried as it says she had a 'haggard face'. I decided that this look should focus around her dry, flakey lips because Miss Havisham is a very nervous and anxious character and I think her stress relief would have been biting and licking her lips. I therefore think they would have had flakes of skin hanging off and they would be bleeding in places where the skin had only just been ripped off. To make the lips look even worse I would add some yellow on one corner to make it look infected with pus and scabbing.

Idea 2

Idea 3 - My favourite!

This idea focuses on when Pip said that Miss Havisham 'looked like the witch of the place'. The book says that she has an 'old ghastly bridal appearance' and that she had 'old restless fingers' which both suggest that she is old, so I decided to emphasise her wrinkles on her forehead, under her eyes, round her lips etc., but making sure to make it look as natural as possible. It says Miss Havisham has 'sunken eyes' and 'dark eyes' so I wanted to show this by adding some dark shadows under and around her eyes. The book says she looks like a 'skeleton', that she has 'shrunk to skin and bone' and she had 'worn away', so I wanted to contour her face with a brown/grey colour to make her face look skinny and hollowed out. Miss Havisham says she had 'never seen the sun since' Pip was born and it says 'daylight never entered the house' which suggests that she would be very pale and 'ghostly' looking, I would therefore make her skin look paler than usual and slightly dry with use of powders. It says that Miss Havisham is 'not physically strong' which suggests she is weak, but could also imply she is prone to infections and illness. This could mean that she had very dry and flaky skin and lips; I would portray this by using lots of powder, some duo glue and some red supra colour. I may add some red to the waterline and along the lower lash line to make it look like she has been crying and to make her look more tried as it says she had a 'haggard face'. I decided to add some broken veins on her cheeks as this is common in older people. I also wanted to add some red around her nose as this is also very common and would make her skin look sore and irritated. The biggest difference in this look is that there is a wart on her face. I wanted to add a wart to show the 'witch' in her coming through. I would achieve this with either a prosthetic piece or by using some kind of wax. I would need to look into the size, shape and colouring of warts to make sure it was accurate. This is my favourite design out of all of them so I will practice this look and develop it on my model's face.

Idea 3

Gothic Horror Shoot


Sunday, 1 February 2015

How to: Black Eye, Cuts, Split lip, Scarring and Sweat

Black Eye

Equipment:
-Supra colour palette
-small angled brush

When it came to learning how to create a black eye with makeup, we were told to get up a photo of a real black eye and use that as our inspiration for our own black eye inspiration. The image that I chose is below.

My inspiration image.
http://wearethemarket.com/wp-content/
uploads/2011/10/black-eye-213x300.jpg


The above images show my outcome. I first applied the really dark purple with a small angled brush to the inner corner and under eye crease. I then I added the red colour to make it look sore and then the yellow colour to add some bruising. I blended all the colours out with my fingers to give it a more realistic look. I am really happy with how it came out, however I think I could have added some more red and yellow just above the cheek bone to make it look bruised all round the eye socket. I also think I could have blended out the purple under her eye more to make it look more realistic and not so harsh. 

Cut/Wound

Equipment:
-Spatula
-Eyelash glue
-Clenser
-Craft knife
-Pin
-Cotton bud
-Hair dryer
-Supra colour palette
-Orange stipple sponge

Step by step:
1. Take some plastic wax with a spatula and massage it on the back of your hand.
2. Roll the wax into a sausage shape and add some eyelash glue along one side.
3. After the glue is tacky, apply it on the skin you want to have a cut on it and smooth the edges down with a spatular and your fingers. (Add some cleanser if the product is lifting up.)
4. Once the edges are smooth, cut the wax open with a craft knife or a pin where you want the cut to be.
5. Manipulate the shape and size of the cut with a pin.
6. Shake up some liquid latex and pour some into a bowl.
7. Take some liquid latex on a cotton bud and coat the wound to set it in place.
8. Take a hair dryer, put it on the cool setting, and dry the wound. (When the latex turns clear, you know it's dry.)


This is when you can decorate your cut how you want to!
9. I took some red supra colour and smudged it round the cut with an orange stipple sponge to make the skin look sore and scratched.
10. I then mixed a purple together and added the purple anywhere I wanted bruising or extra depth.
11. I added yellow supra colour in patches that I thought would have bruised too.
12. I added some blood paste in the cut and at both ends to make it look like there was dried up or thick blood in the cut.
11. I then added some fake blood to make the cut look like it was bleeding. 
12. I finally added some fake puss to make the cut look infected. 


I am really happy with how my cut came out. I think it looks like it could be real and I really like how I have expanded on the makeup by adding some scratches on the knuckles. I love how the pus makes it look really gross and infected. To improve on this, I would make the bump of the cut look more like skin by smoothing it out in a softer gradient. I would also look at images of bruising and try to make the bruising round the cut look more realistic. 

Scarring

Equipment:
-Pin

Step by step:
1. Take some tuplast straight from the tube and create lines with it in the shape of a scar.
2. Pick at it with a pin to make the edges look more ruff.
3. (Optional) You can add some skin coloured base over the top to bland it in with your skin tone. 

This is an image of the demonstration.

Split lip

Equipment:
-Craft knife
-Hair dryer

Step by step:
1. Put foam protector on the area around the lip first.
2. Paint a lot of the collodiom on the area where you want the cut to be.
3. While the liquid is drying, push a craft knife onto the area you want 'cut' and push either side of the skin so it makes a deep indentation.
4. Whilst you are holding the skin together and have taken the craft knife out, dry the collodium with a cool hair dryer.
5. Keep adding layers and using the same technique until the cut is how you want it.

Sweat
Equipment:
-Black stipple sponge
-Glycerin

Step by step:
1. Use a black stipple sponge and stipple the glycerin over the area you want the person to sweat.